


Creating a mobile app can be a daunting task for newcomers, and the Expo CLI simplifies this process but can be exhausting if you don’t know how to use it. Before we dive in, let’s discuss the requirements
Requirements
Install Node JS
Node is needed to install packages, so it is very essential and unnegotiable. To install Node JS, visit Nodejs.org and make sure to install the LTS (long-term support) version.
Install Expo CLI
To install the Expo CLI, type the command into your terminal
npm install -g expo-cli
This should install the Expo CLI globally on your device, which allows you to create a React native app with Expo from any directory on your device.
Install Expo Go
This allows us to view our app in development mode, either on your Android or iOS device. To download the app, visit your app store or Expo Go.
Install Android Studio (optional)
This step is only needed if you want to view the app in development mode on an Android emulator. To install Android Studio, visit Android.com.
Creating your first app
To create your app, cd into the folder you want your project to be created in and run the command below.
npx create-expo-app your-app-name
This should create a React Native project for you. Alternatively, you can try running this command without installing the Expo CLI globally. It will install the CLI for you or prompt you to install it.
Running your app
To start up your app, type the command below into your terminal.
npx expo start
This should run the app if there are no issues with the installation. You should see a QR code and some commands on the terminal.
Run on a Physical Device
This is where the need for Expo Go arises. Expo Go allows us to preview our apps while we build them on both iOS and Android devices.
To view the app, scan the QR code displayed on your terminal.
You might encounter an issue with displaying the app on your phone.
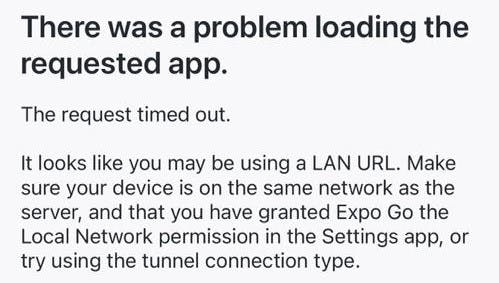
This is because your network might be restrictive, which is common for public Wi-Fi; there might also be firewalls that are common for Windows users; or an emulator misconfiguration can make it difficult to connect a device to your development server over a LAN or Local host.
To resolve this, we use a technique called Tunneling, visit the Expo docs to learn more about this. To enable tunneling, we need to install @expo/ngrok
Type the command below into your terminal.
npm i -g @expo/ngrok
When the package has been installed, type the command below into your terminal to start your dev server from a tunnel URL.
npx expo start --tunnel
This will restart your app; you should see a QR code and some commands on the terminal just like earlier.
Scan the QR code again, and your app should appear on your device.
Run in your browser
React Native is a cross-platform framework, which means that with a single codebase, you can build native or native-like apps for multiple platforms such as Android, iOS, and the Web.
So, you can run your React native code in the browser. To do so, you can type "w" in your terminal, and you might get a warning:

This is because we haven't installed the dependencies required for web support. To install these dependencies, run the command
npx expo install react-native-web@~0.18.10 react-dom@18.2.0 @expo/webpack-config@^18.0.1
When it is done installing, restart your app with this command:
npx expo start --tunnel
Run in an emulator
To create an Android emulator, you need to have Android Studio installed, visit the link to download it, and follow the prompts to install it on your device. You can watch this tutorial to learn how to create a virtual device.
To start your app on the emulator, you can type "a" in your terminal. Please ensure that you do so while your terminal is still running.
Conclusion
If you follow the steps listed above, you can preview your app on various platforms—IOS (Expo Go app), Web (Browser), and Android (emulator)—while you build and fully experience React Native as a cross-platform framework.